如何使用Astra自定义布局创建特色帖子网格
当访问流行的博客时,您可以看到大多数博客的顶部都有一些热门文章。它有助于快速吸引读者对这些文章的注意力,从而提高点击率并降低跳出率。

受此启发,我正在寻找一种方法在我的 WordPress 博客上做到这一点,通过编写一些自定义 PHP、HTML 和 CSS 代码来手动完成此操作。由于我在该网站上使用Astra Pro 主题,因此该过程变得更容易一些。可以使用 Astra 主题内的自定义布局模块从 WordPress 仪表板本身添加代码,而不是将代码添加到主题文件中。本文晓得博客为你介绍如何使用Astra自定义布局创建特色帖子网格
推荐:Astra主题功能特点
先决条件
- 为帖子设置的精选图像
- Astra Pro /Code Snippets插件
- 一些 HTML、CSS 和 PHP 知识
为了使布局看起来如我上面所示,您必须在要突出显示的帖子上设置特色图像。如果没有这一点,设计可能会显得不完整。需要订阅 Astra pro 才能激活自定义布局功能。之后,您应该安装 Pro 插件插件来访问这些额外的功能。
或者如果您使用其他主题,则可以使用代码片段插件从 WordPress 仪表板添加相同的代码,而无需编辑主题文件。
创建特色帖子自定义布局步骤
高级模块允许您设计自定义部分并将其显示在网站的各个位置。自定义 404 页面就是一个示例。该编辑器允许视觉编辑和代码编辑。您还可以使用 Elementor页面构建器来设计布局。但在这里,我们将通过编写一些代码来完成。
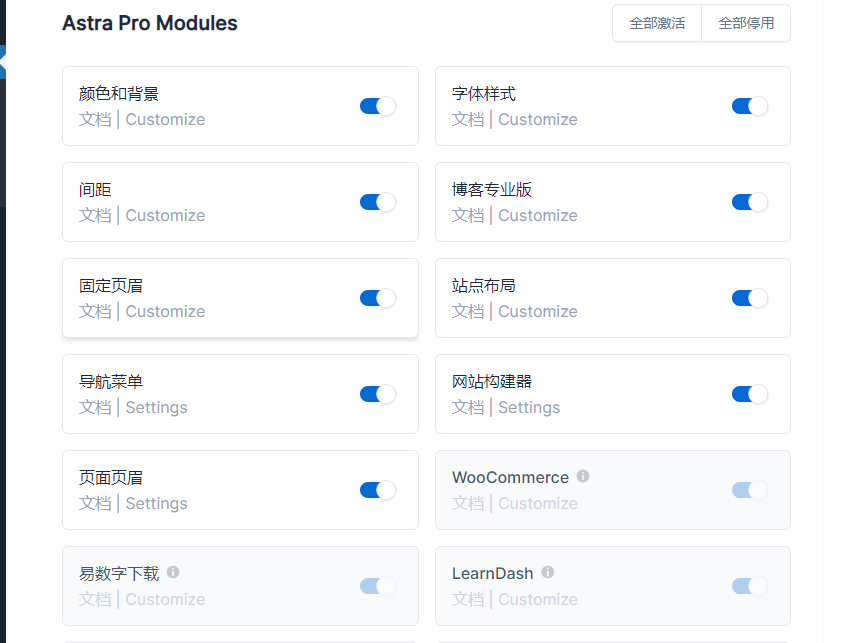
激活Astra自定义布局模块
从 Astra 主题的选项页面激活该模块。激活后,您将在左侧看到一个新的菜单项。单击它以添加新布局。(Astra自定义布局模块现在是Site Builder页面构建器)

添加 PHP 代码

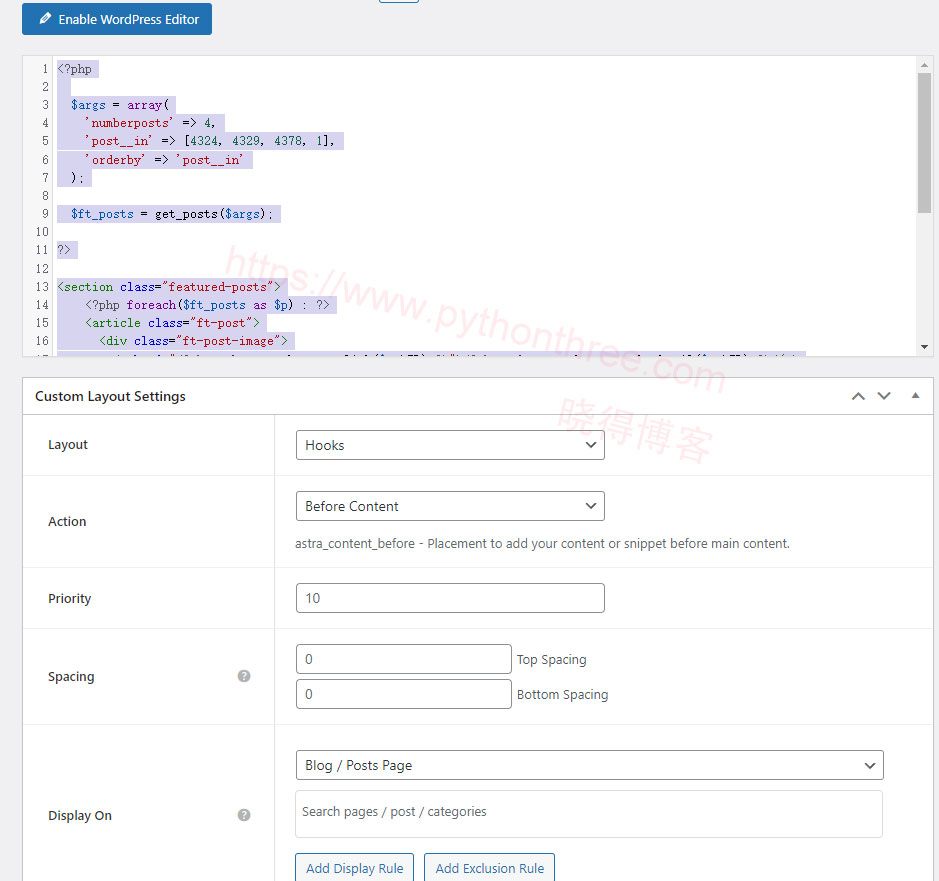
给布局赋予标题后,切换编辑器模式编写代码。它可以包含 PHP 和 HTML 输入。
<?php

	$args = array(
		'numberposts' => 4,
		'post__in' => [4324, 4329, 4378, 1],
		'orderby' => 'post__in'
	);

	$ft_posts = get_posts($args);

?>

<section class="featured-posts">
		<?php foreach($ft_posts as $p) : ?>
		<article class="ft-post">
			<div class="ft-post-image">
				<a href="<?php echo get_the_permalink($p->ID) ?>"><?php echo get_the_post_thumbnail($p->ID) ?></a>
			</div>
			<div class="ft-post-details">
				<header class="ft-post-title">
					<h2>
						<a href="<?php echo get_the_permalink($p->ID) ?>"><?php echo $p->post_title; ?></a>
					</h2>
				</header>
				<div class="ft-post-meta">
					<span class="ft-post-date"><?php echo get_the_date('', $p->ID); ?></span>
				</div>
			</div>
		</article>
		<?php endforeach; ?>
</section> 我们使用该函数get_posts()(内置的 WordPress 函数)从 WordPress 数据库中检索四个帖子。该函数可以接收一个参数——指定条件的变量数组。我们上面使用的其他三个 WordPress 函数是:
get_the_permalink()– 根据帖子 ID 检索帖子的永久链接get_the_post_thumbnail()– 获取帖子的缩略图get_the_date()– 获取发布日期
在post__in密钥内,提供您想要显示为特色的帖子的 ID。稍后,当您想要更改帖子时,您必须更改 ID 密钥。另外,由于我们希望帖子的顺序与数组中给定的顺序相同post__in,因此将orderby键设置为post__in。否则,默认情况下,WordPress 按发布日期的顺序对帖子数组进行排序。
推荐:[最新版]Swift Performance性能插件WordPress优化插件
添加到动作挂钩Hooks,这就是我们在设置部分所做的。由于我们要在博客页面顶部显示布局,因此必须选择“挂钩”选项。
- 使用
beforecontent挂钩。 - 选择显示布局的页面,我们将选择博客/帖子页面选项。它将显示博客存档页面上的布局,同时将其隐藏在各个帖子和页面中。
- 用户角色,我们想向所有用户展示它。所以选择全部。
推荐:Astra主题Container Layout容器布局
添加 CSS 规则
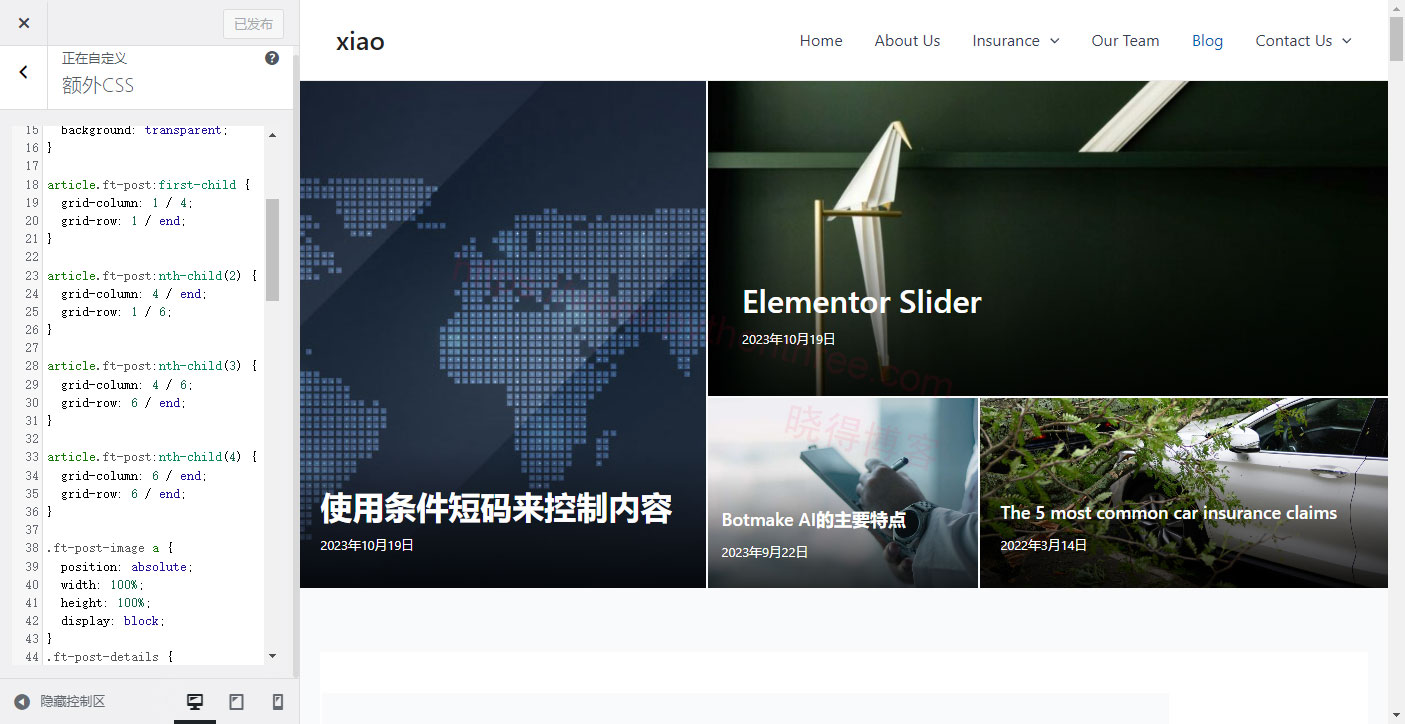
现在,如果我们访问该网站,布局将显示为无样式。所以,我们必须添加一些CSS规则来使其美观。为此,我们将使用 WordPress 定制器,当我们在左侧窗格中编写代码时,它会在右侧显示实时预览。

因此,单击“额外 CSS”选项并添加用于设置布局样式的代码。
.featured-posts {
	display: grid;
	grid-template-columns: repeat(8, 1fr);
	grid-template-rows: repeat(8,1fr);
	height: 70vh;
	grid-column-gap: 2px;
	grid-row-gap: 2px;
}

article.ft-post {
	overflow: hidden;
	padding: 0 !important;
	width: initial !important;
	position: relative;
	background: transparent;
}

article.ft-post:first-child {
	grid-column: 1 / 4;
	grid-row: 1 / end;
}

article.ft-post:nth-child(2) {
	grid-column: 4 / end;
	grid-row: 1 / 6;
}

article.ft-post:nth-child(3) {
	grid-column: 4 / 6;
	grid-row: 6 / end;
}

article.ft-post:nth-child(4) {
	grid-column: 6 / end;
	grid-row: 6 / end;
}

.ft-post-image a {
	position: absolute;
	width: 100%;
	height: 100%;
	display: block;
}
.ft-post-details {
	position: absolute;
	bottom: 0;
	right: 0;
	left: 0;
	padding: 10% 5% 5% 5%;
	background: linear-gradient(to bottom, rgba(0,0,0,0), rgba(0,0,0,.8));
}
.ft-post-title a,
.ft-post-meta {
	color: #fff;
}
.ft-post-image {
	margin: 0 !important;
}
.ft-post-image img {
	display: block;
	width: 100%;
	height: 100%;
	object-fit: cover !important;
	transition: all .3s ease;
}
.ft-post-meta {
	margin: 10px 0;
	font-size: .8em;
}

article.ft-post:nth-child(3) .ft-post-title h2 a,
article.ft-post:nth-child(4) .ft-post-title h2 a{
	font-size: 18px;
}
.ft-post-title h2,
.ft-post-title h2 a {
	line-height: 1;
}

article.ft-post:hover .ft-post-image a img {
	transform: scale(1.1);
}

@media screen and (max-width: 1024px) {
	article.ft-post:first-child {
	grid-column: 1 / 5;
	grid-row: 1 / 5;
}

article.ft-post:nth-child(2) {
	grid-column: 5 / end;
	grid-row: 1 / 5;
}

article.ft-post:nth-child(3) {
	grid-column: 1 / 5;
	grid-row: 5 / end;
}

article.ft-post:nth-child(4) {
	grid-column: 5 / end;
	grid-row: 5 / end;
}
}

@media screen and (max-width: 600px) {
	article.ft-post:first-child {
	grid-column: 1 / end;
	grid-row: 1 / 3;
}

article.ft-post:nth-child(2) {
	grid-column: 1 / end;
	grid-row: 3 / 5;
}

article.ft-post:nth-child(3) {
	grid-column: 1 / end;
	grid-row: 5 / 7;
}

article.ft-post:nth-child(4) {
	grid-column: 1 / end;
	grid-row: 7 / end;
}
	.featured-posts {
		height: 90vh;
	}
	.ft-post-title h2 a {
		font-size: 15px;
	}
	.ft-post-meta {
		display: none;
	}
}
在所有设备预览上验证外观后,单击发布按钮以使编辑生效。
推荐:如何从WordPress中删除Additional CSS额外CSS
总结
以上是晓得博客为你介绍的如何使用Astra自定义布局创建特色帖子网格的全部内容,虽然并非所有博客都需要特色帖子,但它对新闻、旅行和摄影等特定领域有帮助,上面看到的只是实现这一目标的一种方法,如果您了解PHP、HTML 和 CSS,就可以按照您想要的任何方式进行设计,或者使用Astra Spectra插件来实现。
推荐:怎么生成获取Google Translate API Key翻译网站
推荐:Astra主题建站教程


